Why Every Parent and Caregiver Needs Infant CPR Training
The thought of an infant choking or becoming unresponsive is every parent’s worst nightmare. Yet the reality is that choking is one of the leading causes of injury and death among children under the age of four in Canada. Infants are particularly vulnerable because they explore the world by putting objects in their mouths, their airways are significantly smaller than those of older children or adults, and they have not yet developed the coordination to chew food thoroughly.
Knowing how to perform CPR on an infant and how to clear a choking infant’s airway are two of the most critical first aid skills a parent, grandparent, babysitter, or childcare professional can possess. Unlike adult CPR, infant CPR involves different hand positions, compression depths, and techniques that must be learned and practiced specifically for babies under one year of age.
How Infant CPR Differs from Adult CPR
Infant CPR follows the same general principles as adult CPR—maintain circulation and oxygenation until professional help arrives—but the technique is significantly different to account for the infant’s small body and fragile physiology.
For compression hand position, adult CPR uses the heel of both hands placed on the centre of the chest. Infant CPR uses only two fingers—the index and middle fingers—placed just below the nipple line on the centre of the breastbone. For healthcare providers performing two-rescuer infant CPR, the two-thumb encircling technique is preferred, where both thumbs press on the sternum while the hands encircle the infant’s torso.
Compression depth for adults is at least 5 centimetres, while infant compressions should depress the chest approximately 4 centimetres, roughly one-third of the chest depth. The compression rate remains the same at 100 to 120 compressions per minute for both adults and infants. The compression-to-breath ratio for single-rescuer infant CPR is 30 compressions to 2 breaths, identical to the adult ratio.
Rescue breaths for infants are delivered differently as well. Rather than tilting the head back significantly as you would for an adult, the infant’s head should be placed in a neutral position or only slightly tilted. Over-extending an infant’s neck can actually close the airway rather than open it. Breaths should be gentle puffs—just enough to make the chest visibly rise—rather than the fuller breaths given to adults. For infant rescue breaths, cover both the baby’s nose and mouth with your mouth to create a proper seal.
Did You Know?
Hands-on practice is the only way to learn proper infant CPR technique. Online-only courses cannot teach you the correct compression depth and hand position on an infant mannequin.
Step-by-Step: How to Perform Infant CPR
If you find an infant who is unresponsive and not breathing normally, follow these steps immediately.
Step 1: Check for responsiveness. Tap the bottom of the infant’s foot and shout their name. Never shake an infant, as this can cause serious brain injury. If the infant does not respond, they are unresponsive.
Step 2: Call 911. If you are alone, perform two minutes of CPR (approximately five cycles of 30 compressions and 2 breaths) before calling 911. If someone else is present, have them call 911 immediately while you begin CPR. This “CPR first” approach for infants differs from the adult protocol because the most common cause of cardiac arrest in infants is a breathing emergency rather than a heart problem.
Step 3: Place the infant on a firm, flat surface. A table, floor, or firm mattress works well. Ensure the surface is stable so your compressions are effective.
Step 4: Open the airway. Place one hand on the infant’s forehead and gently tilt the head into a neutral or slightly extended position. Lift the chin with the fingertips of your other hand. Do not press on the soft tissue under the chin, as this can obstruct the airway.
Step 5: Check for breathing. Look, listen, and feel for normal breathing for no more than 10 seconds. Occasional gasps are not normal breathing—if the infant is only gasping, treat them as not breathing.
Step 6: Give 2 rescue breaths. Cover the infant’s mouth and nose with your mouth. Give two gentle puffs of air, each lasting about one second, watching for the chest to rise. If the chest does not rise, reposition the head and try again.
Step 7: Begin chest compressions. Place two fingers on the centre of the infant’s chest, just below the nipple line. Press down approximately 4 centimetres (one-third of the chest depth) at a rate of 100 to 120 compressions per minute. Allow the chest to fully recoil between each compression.
Step 8: Continue cycles of 30:2. Alternate 30 compressions with 2 rescue breaths. Continue CPR until the infant begins breathing on their own, emergency medical services arrive and take over, an AED becomes available and advises a shock, or you become too physically exhausted to continue. Instructors at Coast2Coast’s Brampton facility emphasize that high-quality compressions are more important than perfect technique—push hard, push fast, and do not stop.
How to Help a Choking Infant
Choking in infants requires a different approach than the abdominal thrusts (Heimlich manoeuvre) used for adults and older children. Because of the infant’s size and the risk of internal organ damage, back blows and chest thrusts are used instead.
Step 1: Confirm the infant is choking. A choking infant may be unable to cry, cough, or breathe. Their skin may turn blue or dusky. If the infant can cough forcefully, encourage them to keep coughing—do not interfere. Only intervene if the infant cannot cough, cry, or breathe effectively.
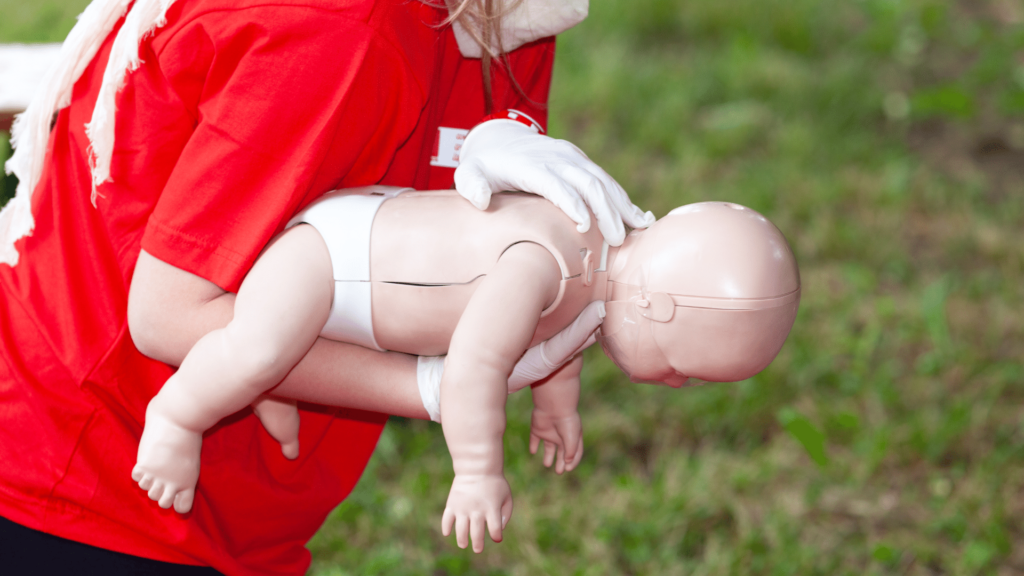
Step 2: Position the infant face-down on your forearm. Support the infant’s head and jaw with your hand, keeping the head lower than the chest. Rest your forearm on your thigh for support.
Step 3: Deliver 5 back blows. Using the heel of your free hand, deliver five firm back blows between the infant’s shoulder blades. Each blow should be a distinct, forceful strike designed to dislodge the object.
Step 4: Turn the infant face-up. Supporting the head and neck, carefully turn the infant onto their back on your other forearm, again keeping the head lower than the chest.
Step 5: Deliver 5 chest thrusts. Place two fingers on the centre of the chest, just below the nipple line (the same position used for infant CPR compressions). Deliver five quick chest thrusts, pressing down approximately 4 centimetres each time.
Step 6: Repeat until the object is dislodged. Continue alternating five back blows and five chest thrusts until the object comes out, the infant begins to cry or breathe, or the infant becomes unresponsive. If the infant becomes unresponsive, immediately begin infant CPR and call 911 if not already done.
Common Choking Hazards for Infants
Prevention is always the best strategy. Understanding what commonly causes infant choking helps parents and caregivers create a safer environment. Food items that frequently cause choking in infants include hot dogs and sausages (particularly when cut into round coins rather than lengthwise strips), whole grapes, raw carrots, popcorn, nuts and seeds, chunks of meat or cheese, hard candy, chewing gum, and spoonfuls of peanut butter.
Non-food items that pose choking risks include small toy parts, buttons, coins, batteries (particularly button batteries, which also pose a chemical burn risk), balloons, pen caps, and small balls. The general guideline is that any object small enough to fit through a toilet paper tube is a potential choking hazard for an infant or toddler. Learning about child safety through a comprehensive first aid course helps parents identify and mitigate these risks before an emergency occurs.
Register for CPR or First Aid Training
Register today for a CPR or First Aid training course at one of our 30+ locations across Canada and the U.S. Check out our facilities and book your spot now.
When to Seek Formal Training
Reading about infant CPR and choking response is a valuable starting point, but it is not a substitute for hands-on training with qualified instructors. The physical techniques involved in infant CPR—compression depth, hand position, breath volume, and head positioning—must be practiced on a mannequin under expert supervision to develop true competency and confidence.
Coast2Coast First Aid & Aquatics offers Standard First Aid and CPR Level C courses that include dedicated modules on infant and child emergencies, choking response for all age groups, and AED operation. These courses are available at over 30 locations across Canada—including Hamilton, Kitchener, Edmonton, and Oakville—and in the United States at our Los Angeles location. New parents, grandparents, babysitters, daycare workers, and anyone who cares for infants or young children should prioritize getting certified.
Conclusion
Infant CPR and choking response are skills that every parent and caregiver should learn before they ever need to use them. The techniques differ significantly from adult CPR, and proper training ensures that you can act confidently and correctly in the critical minutes before paramedics arrive. Whether your baby is six weeks old or ten months old, whether you are a first-time parent or an experienced grandparent, the time to learn these skills is now—not during an emergency.
About the Author
Ashkon Pourheidary, B.Sc. (Hons) — Co-Founder, Coast2Coast First Aid & Aquatics
Ashkon has been a certified First Aid and CPR instructor since 2011 and an Instructor Trainer since 2013. He is also a certified Emergency Medical Responder (EMR) instructor, Psychological First Aid instructor, and BLS (Basic Life Support) instructor. Ashkon graduated with honours with a Bachelor of Science in Neuroscience from the University of Toronto in 2016. As co-founder of Coast2Coast First Aid & Aquatics, he has helped grow the organization to over 30 locations across Canada and into the United States. Ashkon has served on the First Aid Council for the Canadian Red Cross. He spends his time coaching the team of over 100 instructors at Coast2Coast to ensure that students training at Coast2Coast locations receive the best training experience. Connect on LinkedIn