We offer courses in Canada and the US. If you are experiencing issues with our website and need help to register, or if you have questions, please call us at 866-291-9121.
If you are facing any issues with your online course, registration, or training, please click here to submit a help request.
If you are facing any issues with your online course, registration, or training, please click here to submit a help request.
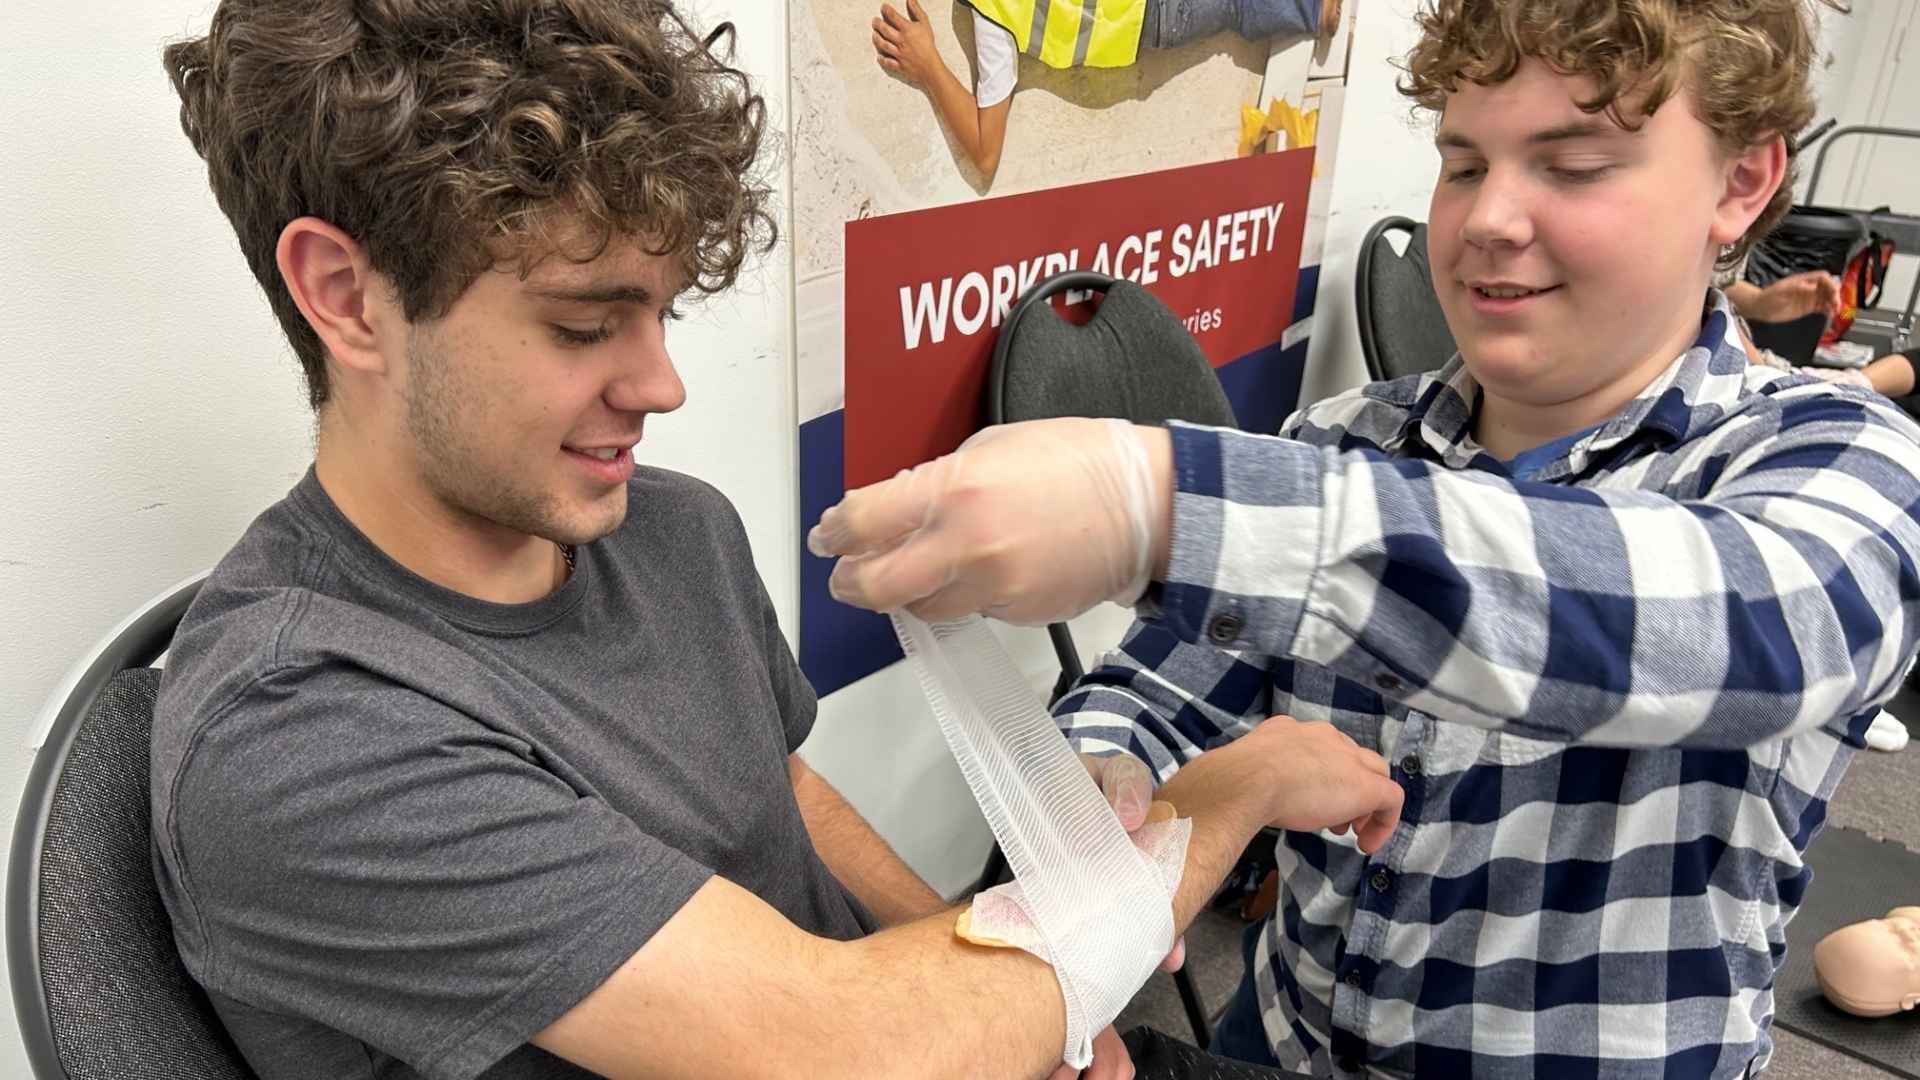
Poisons that enter the body through the mouth and digestion system are known as Ingested Poisons, or Swallowed Poisons as well. Many poisons that are swallowed are cleaning supplies, medication, or expired liquid products such as cosmetics or household products. More than 90% of poisonings occur in the home.
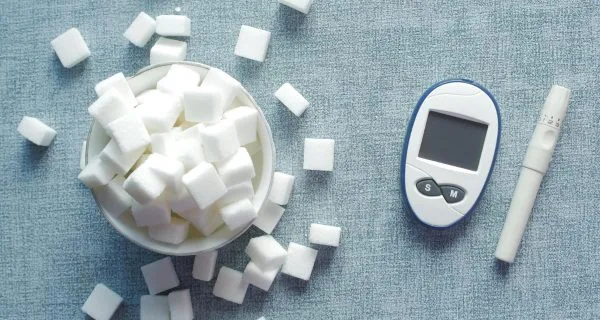
World Diabetes Day: Understanding Diabetes and Emergency First Aid
Every year on November 14th, the global community observes World Diabetes Day to raise awareness about one of the fastest-growing health conditions in the world. In Canada alone, more than 3.7 million people are living with diabetes, and that number continues to rise every year. While diabetes is primarily managed through lifestyle modifications and medical treatment, the condition can produce life-threatening emergencies that require immediate first aid intervention. Understanding how to recognize and respond to diabetic emergencies is an essential skill that every Canadian should possess — and a key component of comprehensive first aid training.
World Diabetes Day was established in 1991 by the International Diabetes Federation and the World Health Organization in response to growing concerns about the escalating health threat posed by diabetes. November 14th was chosen because it marks the birthday of Sir Frederick Banting, the Canadian physician and scientist who co-discovered insulin in 1921 at the University of Toronto — a breakthrough that has saved millions of lives worldwide and remains one of Canada’s greatest contributions to global health.
Types of Diabetes Explained
To understand diabetic emergencies, it helps to understand the different types of diabetes and how they affect the body:
Type 1 Diabetes
Type 1 diabetes is an autoimmune condition in which the body’s immune system attacks and destroys the insulin-producing cells in the pancreas. Without insulin, the body cannot move glucose from the bloodstream into cells for energy. People with Type 1 diabetes must take insulin injections or use an insulin pump every day to survive. This type accounts for approximately 5 to 10 percent of all diabetes cases and is most commonly diagnosed in children and young adults, though it can develop at any age.
Type 2 Diabetes
Type 2 diabetes is the most common form, accounting for about 90 percent of all cases. It develops when the body becomes resistant to insulin or when the pancreas gradually loses its ability to produce enough insulin. Risk factors include family history, obesity, physical inactivity, age, and ethnicity. Type 2 diabetes is increasingly being diagnosed in younger people, including teenagers, largely due to rising rates of childhood obesity and sedentary lifestyles.
Gestational Diabetes
This form of diabetes develops during pregnancy and typically resolves after the baby is born. However, women who have had gestational diabetes have a significantly higher risk of developing Type 2 diabetes later in life. Proper monitoring and management during pregnancy are essential for the health of both mother and baby.
Recognizing Diabetic Emergencies
Diabetic emergencies occur when blood sugar levels become dangerously high or dangerously low. Both conditions can be life-threatening and require prompt first aid:
Hypoglycemia (Low Blood Sugar)
Hypoglycemia occurs when blood glucose levels drop below normal, typically below 4.0 mmol/L. This is the more common and more immediately dangerous diabetic emergency. It can develop rapidly — within minutes — and can quickly progress to unconsciousness and seizures if not treated. Causes include taking too much insulin, skipping meals, excessive physical activity, and alcohol consumption.
Signs and symptoms of hypoglycemia include shakiness and trembling, sweating and pale skin, rapid heartbeat, dizziness and lightheadedness, confusion and difficulty concentrating, irritability or sudden mood changes, hunger, blurred vision, weakness and fatigue, and in severe cases, loss of consciousness and seizures.
Hyperglycemia (High Blood Sugar)
Hyperglycemia occurs when blood glucose levels rise significantly above normal, typically above 11.0 mmol/L. Unlike hypoglycemia, hyperglycemia usually develops gradually over hours or days. If left untreated, it can progress to a dangerous condition called diabetic ketoacidosis (DKA) in people with Type 1 diabetes, or hyperosmolar hyperglycemic state (HHS) in people with Type 2 diabetes. Both conditions are medical emergencies that require immediate hospital treatment.
Signs and symptoms of hyperglycemia include excessive thirst, frequent urination, dry mouth and skin, nausea and vomiting, abdominal pain, fruity-smelling breath (a sign of DKA), deep and rapid breathing, confusion and drowsiness, and eventual loss of consciousness.
Safety Tip: If you are unsure whether someone is experiencing high or low blood sugar, always treat for low blood sugar first by giving them something sweet to eat or drink. Treating for low blood sugar when it is actually high will cause minimal harm, but failing to treat dangerously low blood sugar can be fatal.
Essential Protocols for First Aid for Diabetic Emergencies
Providing effective first aid for diabetic emergencies requires a rapid assessment of the victim’s level of consciousness and their ability to swallow safely. In 2026, clinical guidelines emphasize the “Rule of 15” for conscious patients: administer 15 grams of fast-acting glucose and wait 15 minutes to re-test. If you are performing first aid for diabetic emergencies and the person becomes unconscious, you must immediately transition to airway management and call 911, as the risk of aspiration makes oral glucose dangerous. By maintaining a calm environment and sitting the person down, you can prevent secondary injuries from falls during a hypoglycemic episode. Consistent first aid for diabetic emergencies training ensures that bystanders can differentiate between a “sugar low” and other medical crises like a stroke.
First Aid for Diabetic Emergencies
Responding to Hypoglycemia
If the person is conscious and able to swallow, give them 15 to 20 grams of fast-acting sugar immediately. This can be 4 glucose tablets, half a cup (125 mL) of fruit juice or regular soft drink, 1 tablespoon of honey or sugar, or 6 to 7 hard candies. After 15 minutes, check if symptoms have improved. If they have not, repeat the sugar intake. Once symptoms improve, encourage the person to eat a more substantial snack containing both carbohydrates and protein to stabilize their blood sugar.
If the person is unconscious or unable to swallow safely, do not attempt to give them anything by mouth as this creates a choking risk. Call 911 immediately. Place the person in the recovery position on their side to protect their airway. If the person carries a glucagon injection kit, and you have been trained to use it, administer the glucagon as directed. Stay with the person and monitor their breathing until paramedics arrive.
Responding to Hyperglycemia
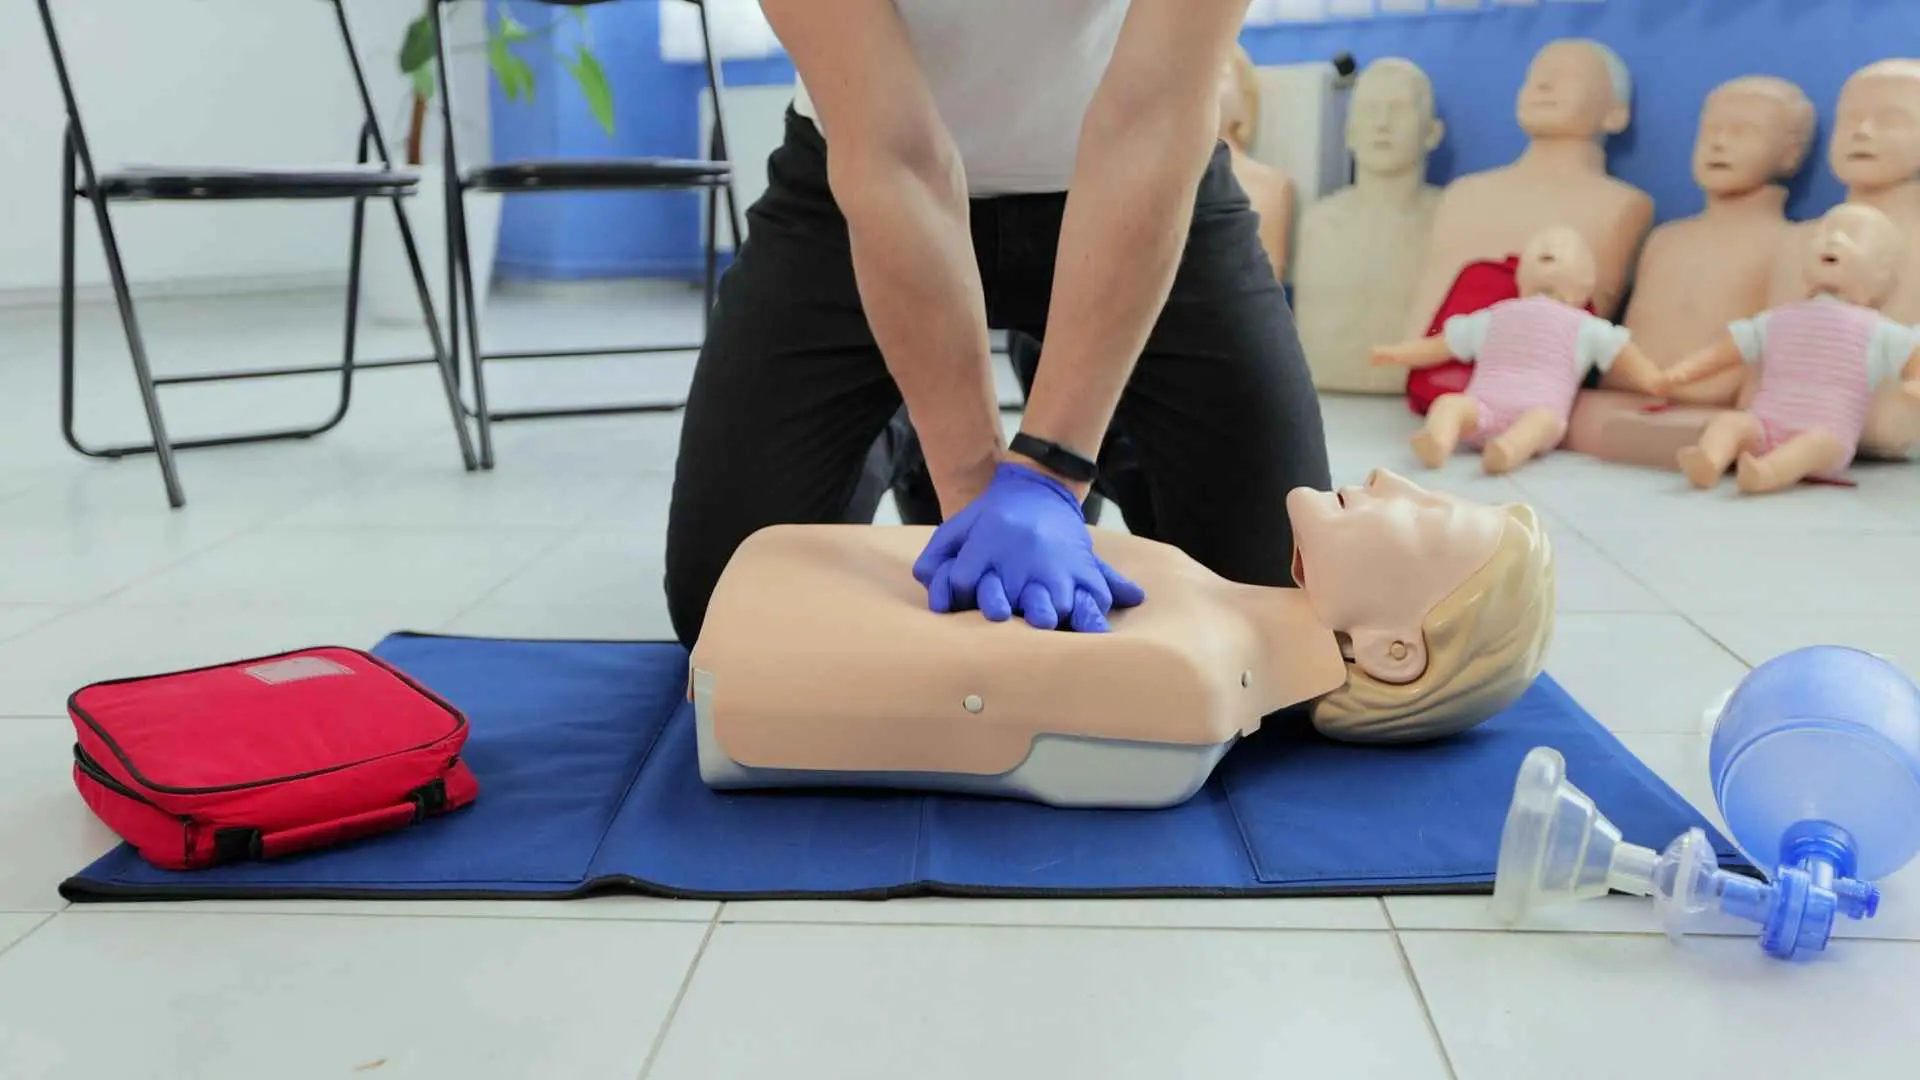
Hyperglycemia that has progressed to DKA or HHS requires emergency medical treatment. Call 911 if the person is vomiting, has fruity-smelling breath, is breathing abnormally, or is showing signs of altered consciousness. While waiting for emergency services, keep the person comfortable, monitor their breathing and level of consciousness, and be prepared to perform CPR if they stop breathing.
Watch: First Aid for CPR Emergencies
Diabetes in the Workplace
With millions of Canadians living with diabetes, virtually every workplace has employees managing the condition. Employers have both a legal and ethical responsibility to ensure that their workplaces are safe and supportive for employees with diabetes. This includes allowing employees to monitor their blood sugar and take medications as needed, providing access to food and beverages for managing blood sugar levels, training designated first aiders to recognize and respond to diabetic emergencies, and including diabetes management in workplace emergency plans.
Investing in workplace first aid training that covers diabetic emergencies ensures that coworkers can respond effectively when someone experiences a blood sugar crisis. This training creates a safer work environment and demonstrates an employer’s commitment to the health and wellbeing of their team.
Preventing Diabetes: Risk Reduction Strategies
While Type 1 diabetes cannot currently be prevented, the risk of developing Type 2 diabetes can be significantly reduced through lifestyle modifications. Maintaining a healthy weight, engaging in at least 150 minutes of moderate physical activity per week, eating a balanced diet rich in whole grains, fruits, vegetables, and lean proteins, limiting consumption of processed foods and sugary drinks, monitoring blood pressure and cholesterol levels, and getting regular health screenings are all proven strategies for reducing diabetes risk.
Physical activities like swimming are particularly beneficial for diabetes prevention and management because they provide excellent cardiovascular exercise while being gentle on the joints. Regular physical activity improves insulin sensitivity, helps maintain a healthy weight, and reduces stress — all of which contribute to better blood sugar control and overall health.
First Aid Training Saves Lives in Diabetic Emergencies
Diabetic emergencies can strike suddenly and without warning, making it essential that people around those with diabetes know how to respond. A coworker, family member, teacher, or bystander who recognizes the signs of a diabetic emergency and provides appropriate first aid can literally save a life. Comprehensive first aid courses cover diabetic emergencies alongside other critical skills, ensuring that certified first aiders are prepared for the full spectrum of medical emergencies they may encounter.
This World Diabetes Day, consider taking action by learning the signs and symptoms of diabetic emergencies, talking to friends and family members with diabetes about their emergency action plans, ensuring your workplace has trained first aiders, and enrolling in a first aid course that covers medical emergencies including diabetes. Every person who gains this knowledge becomes part of a safer, more prepared community.
Executive Summary: Observing World Diabetes Day involves more than awareness; it requires the ability to provide life-saving first aid for diabetic emergencies. Per 2026 CSA Z1210:24 standards, bystanders should prioritize treating suspected hypoglycemia with 15g of fast-acting sugar while avoiding oral administration for unconscious victims. With over 3.7 million Canadians affected, mastering the “Rule of 15” and recognizing the signs of DKA are essential skills. Coast2Coast offers Basic and Intermediate First Aid courses to ensure you are prepared for blood sugar crises in any environment.
Be Prepared for Medical Emergencies
Learn to recognize and respond to diabetic emergencies, cardiac events, and more with a Canadian Red Cross First Aid course from Coast2Coast First Aid and Aquatics.
Ashkon Pourheidary, B.Sc. (Hons) — Co-Founder, Coast2Coast First Aid & Aquatics
Ashkon has been a certified First Aid and CPR instructor since 2011 and an Instructor Trainer since 2013. He is also a certified Emergency Medical Responder (EMR) instructor, Psychological First Aid instructor, and BLS (Basic Life Support) instructor. Ashkon graduated with honours with a Bachelor of Science in Neuroscience from the University of Toronto in 2016. As co-founder of Coast2Coast First Aid & Aquatics, he has helped grow the organization to over 30 locations across Canada and into the United States. Connect on LinkedIn
A seizure is a matter of abnormal electrical signals in the brain that result in temporary and involuntary disruptions in brain function, shaking or contraction of limbs (convulsions),changes in sensory processing, behaviour deviation, and altered levels of coherence.
What Is an Emergency Medical Responder (EMR) Course?
An Emergency Medical Responder (EMR) course is an advanced pre-hospital care training program that prepares individuals to provide immediate life-saving medical assistance in emergency situations. Unlike standard first aid or CPR/AED courses, EMR training goes significantly deeper into patient assessment, trauma management, medical emergencies, and the use of specialized equipment. EMR-certified individuals serve as the critical bridge between the moment an emergency occurs and the arrival of paramedics or hospital-based care, making this certification invaluable for anyone working in high-risk environments or pursuing a career in emergency services.
In Canada, the EMR certification program is designed to meet the standards set by provincial regulatory bodies and is recognized nationally as a foundational credential in the emergency medical services profession. Whether you are a firefighter, lifeguard, security professional, remote worker, or someone considering a career in paramedicine, EMR training provides the knowledge and skills to manage complex medical emergencies with competence and confidence.
Who Should Take an EMR Course?
While EMR certification is valuable for virtually anyone, certain groups benefit particularly from this advanced level of training:
Aspiring Paramedics and Healthcare Professionals
For individuals pursuing a career in paramedicine, nursing, or emergency medicine, EMR certification serves as an essential stepping stone. Many paramedic programs across Canada either require or strongly recommend EMR certification as a prerequisite for admission. The course provides a solid foundation in patient care principles, medical terminology, and clinical skills that prepare students for the more advanced training that follows in paramedic college programs.
Firefighters and Law Enforcement Officers
First responders such as firefighters and police officers are frequently the first to arrive at emergency scenes. EMR training equips these professionals with the medical knowledge to assess patients, manage injuries, and provide stabilizing care while waiting for ambulance services. Many fire departments and police services across Canada require or encourage their members to hold EMR certification.
Industrial and Remote Workers
Workers in mining, oil and gas, forestry, construction, and other industrial sectors often operate in remote locations where ambulance response times may be 30 minutes or longer. For these workers, EMR-level training can be the difference between life and death, as they may need to manage serious injuries and medical emergencies for extended periods before professional medical help arrives. Many employers in these industries require EMR certification as a condition of employment.
Lifeguards and Aquatic Professionals
Aquatic environments present unique emergency scenarios including drowning, spinal injuries from diving accidents, and hypothermia. Lifeguards with EMR certification possess advanced assessment and management skills that complement their water rescue training, making them more effective at managing complex aquatic emergencies. BLS certification is often a companion credential for aquatic professionals alongside EMR.
Safety Tip: EMR training teaches the systematic patient assessment approach used by all emergency medical professionals. Learning to assess a patient from head to toe using a structured method ensures that no injuries or conditions are missed during an emergency.
What You Will Learn in an EMR Course
An EMR course covers an extensive curriculum designed to prepare you for a wide range of medical emergencies. The training combines theoretical classroom instruction with hands-on practical skills sessions and realistic emergency simulations. Here is an overview of the major topics covered:
Core Competencies of an Emergency Medical Responder Course
Enrolling in an Emergency Medical Responder course transitions a student from basic first aid to advanced clinical intervention. The primary objective of an Emergency Medical Responder course is to master the “Primary Survey,” where you learn to identify and treat life-threatening issues with the airway, breathing, and circulation (ABCs) in seconds. Throughout an Emergency Medical Responder course, you will move beyond simple bandages to utilizing specialized equipment like manual suction units, oxygen cylinders, and cervical collars. By the end of an Emergency Medical Responder course, participants are capable of leading a medical team during multi-system trauma events, ensuring that high-level care is maintained until a paramedic transport unit arrives.
Patient Assessment
The cornerstone of EMR training is learning how to systematically assess a patient. You will learn to perform primary surveys to identify and address immediately life-threatening conditions, followed by secondary surveys that involve a thorough head-to-toe physical examination. You will also learn to obtain a patient history using standardized questioning techniques, take vital signs including blood pressure, pulse, respiratory rate, and oxygen saturation, and document your findings accurately for handover to paramedics.
Airway Management and Oxygen Therapy
Managing a patient’s airway is the single most critical skill in emergency medicine. EMR training covers advanced airway management techniques including the use of oropharyngeal and nasopharyngeal airways, suctioning equipment, and supplemental oxygen delivery systems. You will learn to recognize and manage airway obstructions, perform advanced rescue breathing techniques, and use bag-valve-mask (BVM) devices for assisted ventilation.
Trauma Management
Traumatic injuries — from motor vehicle accidents, falls, workplace incidents, and other causes — require specialized knowledge to manage effectively. The EMR course covers wound care, splinting and immobilization of fractures and dislocations, spinal motion restriction techniques, management of chest and abdominal injuries, burn treatment, and multi-system trauma assessment. You will learn to rapidly identify the most serious injuries and prioritize treatment accordingly.
Medical Emergencies
Beyond trauma, EMR students learn to recognize and manage a wide range of medical conditions including cardiac emergencies, stroke, diabetic emergencies, seizures, respiratory distress, allergic reactions and anaphylaxis, poisoning, and environmental emergencies such as hypothermia and heat stroke. Understanding these conditions and their management is essential for providing effective pre-hospital care.
CPR and Defibrillation
EMR training includes comprehensive CPR and AED certification at the healthcare provider level. This goes beyond basic CPR to include two-rescuer CPR techniques, advanced airway management during resuscitation, and the integration of AED use into a coordinated resuscitation effort. You will practice these skills extensively to develop the muscle memory needed to perform them effectively under the stress of a real cardiac arrest.
Watch: What EMR Training Involves
Course Structure and Duration
The EMR course is significantly more comprehensive than standard first aid training. Depending on the training provider and delivery format, the course typically ranges from 40 to 80 hours of instruction. This includes classroom lectures covering medical theory and protocols, hands-on skills labs where you practice techniques on mannequins and simulated patients, scenario-based training using realistic emergency simulations, and written and practical examinations to assess your competence.
Some training providers offer intensive formats that condense the course into consecutive days, while others spread the training over several weekends to accommodate working professionals. Blended learning options may also be available, allowing you to complete theoretical components online before attending in-person practical sessions. Regardless of the format, the practical skills component requires in-person attendance, as hands-on practice is essential for developing the competence needed to perform these skills in real emergencies.
EMR Certification Requirements and Recertification
To earn your EMR certification, you must successfully complete all course components and pass both written and practical examinations. The written exam tests your theoretical knowledge of anatomy, physiology, pathophysiology, and treatment protocols. The practical exam evaluates your ability to perform patient assessments and manage simulated emergency scenarios under timed conditions. Most provinces require a minimum passing grade of 70 to 75 percent on both components.
EMR certification is typically valid for three years, after which you must complete a recertification course to maintain your credentials. Recertification ensures that your skills remain current and that you are updated on any changes to treatment protocols or best practices. Staying current with your certification demonstrates professionalism and commitment to providing the highest standard of emergency care.
Career Opportunities with EMR Certification
EMR certification opens doors to a variety of career paths in emergency services and beyond. Certified EMRs work in fire departments, industrial sites, event management companies, private ambulance services, remote medical facilities, security firms, and outdoor recreation organizations. The certification also serves as a competitive advantage for lifeguards, security professionals, and fitness instructors who want to differentiate themselves in the job market.
For those pursuing paramedicine as a career, EMR certification provides invaluable practical experience that strengthens paramedic school applications and prepares students for the academic rigour of advanced emergency medical training. Many successful paramedics credit their EMR training as the foundation that gave them the confidence and clinical thinking skills needed to excel in their careers.
Executive Summary: An Emergency Medical Responder (EMR) course provides the advanced clinical skills necessary to manage complex trauma and medical crises. Far exceeding Basic or Intermediate First Aid, this 80-hour program aligns with 2026 CSA Z1210:24 standards for high-risk workplace responders. Whether you are preparing for a career in paramedicine or securing a remote industrial site, EMR certification ensures you can provide emergency room level assessment and stabilization in the field.
Start Your EMR Training Journey
Take your emergency response skills to the next level with an Emergency Medical Responder course from Coast2Coast First Aid and Aquatics. Prepare for a rewarding career in emergency services with comprehensive, hands-on training.
Ashkon Pourheidary, B.Sc. (Hons) — Co-Founder, Coast2Coast First Aid & Aquatics
Ashkon has been a certified First Aid and CPR instructor since 2011 and an Instructor Trainer since 2013. He is also a certified Emergency Medical Responder (EMR) instructor, Psychological First Aid instructor, and BLS (Basic Life Support) instructor. Ashkon graduated with honours with a Bachelor of Science in Neuroscience from the University of Toronto in 2016. As co-founder of Coast2Coast First Aid & Aquatics, he has helped grow the organization to over 30 locations across Canada and into the United States. Connect on LinkedIn
As a pet owner, few situations are more terrifying than discovering that your beloved animal has stopped breathing. Whether caused by choking, allergic reactions, trauma, drowning, or underlying health conditions, respiratory emergencies in pets require immediate action. Just as first aid training prepares you to help humans in emergencies, understanding basic pet first aid can give you the knowledge and confidence to potentially save your pet’s life during the critical minutes before veterinary care is available.
The first step in any pet emergency is recognizing the signs that your animal is in respiratory distress. Normal breathing in dogs ranges from 10 to 30 breaths per minute, while cats typically breathe 20 to 30 times per minute at rest. Signs that your pet may be experiencing a breathing emergency include visibly laboured or shallow breathing, blue or grey gums and tongue (known as cyanosis), gasping or wheezing sounds, complete absence of chest movement, collapse or loss of consciousness, and unresponsiveness to touch or voice.
Essential Steps for Pet First Aid and CPR
Performing pet first aid requires a rapid transition from assessment to action, as permanent brain damage can occur within minutes of respiratory arrest. When administering pet first aid, your first priority is to ensure the airway is clear of obstructions like small toys or treats before beginning rescue breaths. In 2026, veterinary protocols emphasize the “ABC” method (Airway, Breathing, Circulation) specifically adapted for animal anatomy, such as utilizing the snout for breaths rather than the mouth. By maintaining a steady rhythm of 100–120 compressions per minute during pet first aid, you mimic the natural heart rate of a distressed animal, significantly increasing the chances of successful resuscitation until you reach an emergency clinic.
Immediate Steps When Your Pet Stops Breathing
If you discover that your pet is not breathing, staying calm is essential. Panic leads to poor decisions and wasted time. Follow these steps methodically to give your pet the best possible chance of survival:
Step 1: Assess the Situation Safely
Even the most gentle pet can bite when in distress or when regaining consciousness. Approach your pet carefully and be aware that an animal in a medical emergency may react unpredictably. If your pet is unconscious, gently check for responsiveness by calling their name and lightly tapping their shoulder. If there is no response, proceed immediately to the next steps.
Step 2: Check the Airway
Open your pet’s mouth and look for any visible obstructions. Foreign objects such as bones, toys, sticks, or pieces of food are common causes of airway blockage in pets. If you can see an object, carefully attempt to remove it with your fingers or a pair of tweezers. Be extremely careful not to push the object further down the throat. If the object is not visible or cannot be reached, do not spend excessive time trying to clear the airway — move to rescue breathing.
Step 3: Extend the Head and Neck
Gently pull your pet’s tongue forward and straighten their neck to open the airway. For dogs, tilt the head back slightly to create a clear passage for air. For cats, be gentler with the neck extension as their airways are more delicate. Close your pet’s mouth and ensure the lips are sealed around the teeth.
Safety Tip: Always call your emergency veterinarian or the nearest animal hospital before or while performing pet CPR. Having professional guidance on the phone can help you through the process and ensure you get your pet to medical care as quickly as possible.
How to Perform Rescue Breathing on Your Pet
Rescue breathing for pets follows similar principles to human rescue breathing, with important modifications based on the size of the animal:
For Medium to Large Dogs
Close your pet’s mouth firmly and place your mouth over their nose, creating a seal around both nostrils. Blow gently into the nose until you see the chest rise visibly. The breath should be firm enough to inflate the lungs but not so forceful that you risk damaging delicate lung tissue. Give one breath every 3 to 5 seconds, checking between breaths to see if the dog has started breathing on their own. Watch for the chest to fall between breaths, indicating that air is being expelled naturally.
For Small Dogs and Cats
For smaller animals, the technique is slightly different. Place your mouth over both the nose and mouth of the animal, creating a complete seal. Blow very gently — small animals have much smaller lung capacity and can be injured by excessive air pressure. Give smaller, shorter breaths every 2 to 3 seconds. The chest should rise slightly with each breath. Be particularly gentle with kittens, puppies, and toy breed dogs, as their respiratory systems are extremely delicate.
Pet CPR: When the Heart Has Stopped
If your pet has no pulse in addition to not breathing, you will need to perform cardiopulmonary resuscitation (CPR). Check for a pulse by placing your fingers on the inside of the hind leg, near the groin area, where the femoral artery is located. If you cannot detect a pulse after 10 seconds of checking, begin chest compressions immediately.
Chest Compressions for Dogs
For medium to large dogs, lay the animal on their right side on a firm surface. Place the heel of one hand over the widest part of the ribcage and place your other hand on top. Compress the chest by approximately one-third to one-half of its width at a rate of 100 to 120 compressions per minute. For barrel-chested breeds like bulldogs, place the dog on their back and compress directly over the breastbone, similar to human CPR positioning. After every 30 compressions, give 2 rescue breaths.
Chest Compressions for Cats and Small Dogs
For cats and small dogs, wrap one hand around the chest so that your thumb is on one side and your fingers are on the other, directly over the heart. Squeeze the chest between your thumb and fingers, compressing by about one-third of the chest width. Alternatively, you can use the one-hand technique with the animal lying on their side. Maintain the same rate of 100 to 120 compressions per minute with 2 rescue breaths after every 30 compressions.
Watch: CPR First Aid Basics
Common Causes of Breathing Emergencies in Pets
Understanding what can cause your pet to stop breathing helps you prevent emergencies and respond more effectively when they occur:
Choking
Dogs are particularly prone to choking on bones, toys, sticks, and large pieces of food. Cats may choke on string, ribbon, small toys, or hairballs. Supervise your pet during mealtimes and playtime, and ensure that toys are appropriately sized for your animal. Avoid giving dogs cooked bones, which can splinter and create dangerous choking hazards.
Allergic Reactions
Severe allergic reactions (anaphylaxis) can cause the throat to swell shut, cutting off the airway. Common triggers include insect stings, certain foods, medications, and environmental allergens. If your pet has a history of severe allergies, discuss an emergency action plan with your veterinarian, which may include carrying an epinephrine auto-injector designed for animals.
Heatstroke
Dogs are especially vulnerable to heatstroke because they cannot regulate body temperature as efficiently as humans. A dog left in a hot car, exercised vigorously on a hot day, or kept in an environment without shade and water can quickly develop heatstroke, which can lead to respiratory failure. Brachycephalic breeds — those with flat faces like pugs, bulldogs, and Persian cats — are at particularly high risk.
Drowning
While many dogs are natural swimmers, not all are equally capable in water. Pets can drown in pools, ponds, bathtubs, and even large water bowls. Always supervise pets around water, ensure pools have accessible exit points, and consider a pet life jacket for boating activities. Understanding CPR techniques is just as valuable for pet water emergencies as it is for humans.
When to Transport Your Pet to the Veterinarian
Even if you successfully restore your pet’s breathing through rescue breathing or CPR, immediate veterinary care is essential. The underlying cause of the respiratory arrest must be identified and treated, and your pet will need monitoring for complications. Transport your pet to the nearest emergency veterinary clinic as quickly and safely as possible. If you are performing CPR, continue rescue efforts during transport if you have someone else to drive.
When to Visit the Veterinary Emergency Room
Knowing when to rush to the emergency room is a critical component of pet ownership, especially following a near-drowning or choking incident. Even if your pet regains consciousness after receiving pet first aid, they must be evaluated at an emergency room for secondary complications like “dry drowning” (fluid in the lungs) or internal rib fractures from compressions. In a clinical emergency room setting, veterinarians can provide supplemental oxygen, intravenous fluids, and advanced monitoring that cannot be replicated at home. Never delay transport; if you are alone, perform pet first aid for two minutes to stabilize the animal, then immediately move toward the nearest emergency room while continuing cycles of care if possible.
How Human First Aid Training Helps with Pet Emergencies
The skills you learn in a standard first aid course provide a strong foundation for responding to pet emergencies. The principles of assessing a scene, checking for responsiveness, maintaining an airway, performing rescue breathing, and delivering chest compressions are fundamentally similar across species. Pet owners who have completed CPR and AED certification consistently report feeling more confident and capable when facing pet medical emergencies, because the core skills transfer directly.
Additionally, first aid training teaches you to remain calm under pressure, to prioritize actions effectively, and to recognize when a situation requires professional medical intervention. These are exactly the qualities that can save your pet’s life in a breathing emergency. While veterinary-specific first aid courses exist, having a solid foundation in human first aid gives you a significant advantage in any emergency situation, whether the patient has two legs or four.
Executive Summary: Responding to a pet that has stopped breathing requires immediate pet first aid, including clearing the airway and performing species-specific CPR. For dogs, breaths are delivered through the nose, while for cats, the mouth and nose are covered simultaneously. Even if resuscitation is successful at home, a visit to the emergency room is mandatory to check for internal injuries or fluid in the lungs. Coast2Coast training emphasizes that the confidence gained in human CPR and First Aid courses is the foundation for successfully managing animal emergencies.
Build Your Emergency Response Skills
Learning CPR and first aid protects not just your family but your pets too. Enroll in a Canadian Red Cross first aid course with Coast2Coast First Aid and Aquatics and gain the confidence to respond to any emergency.
Ashkon Pourheidary, B.Sc. (Hons) — Co-Founder, Coast2Coast First Aid & Aquatics
Ashkon has been a certified First Aid and CPR instructor since 2011 and an Instructor Trainer since 2013. He is also a certified Emergency Medical Responder (EMR) instructor, Psychological First Aid instructor, and BLS (Basic Life Support) instructor. Ashkon graduated with honours with a Bachelor of Science in Neuroscience from the University of Toronto in 2016. As co-founder of Coast2Coast First Aid & Aquatics, he has helped grow the organization to over 30 locations across Canada and into the United States. Connect on LinkedIn
Julia Lane from Windsor, Ontario proves to Canada and the world that anyone can swim, no matter what obstacles one may face.
The 18-year-old competed with hundreds of youths and adults at the Down Syndrome World Swimming Championships in Truro, Nova Scotia in July, coming home with a silver medal and four bronze medals – a feat for any trained competitive swimmer. Lane was one of only twenty-two swimmers representing Canada, with over twenty-five countries representing themselves at the Championship.
Understanding Emergency First Aid for Mass Casualty Events
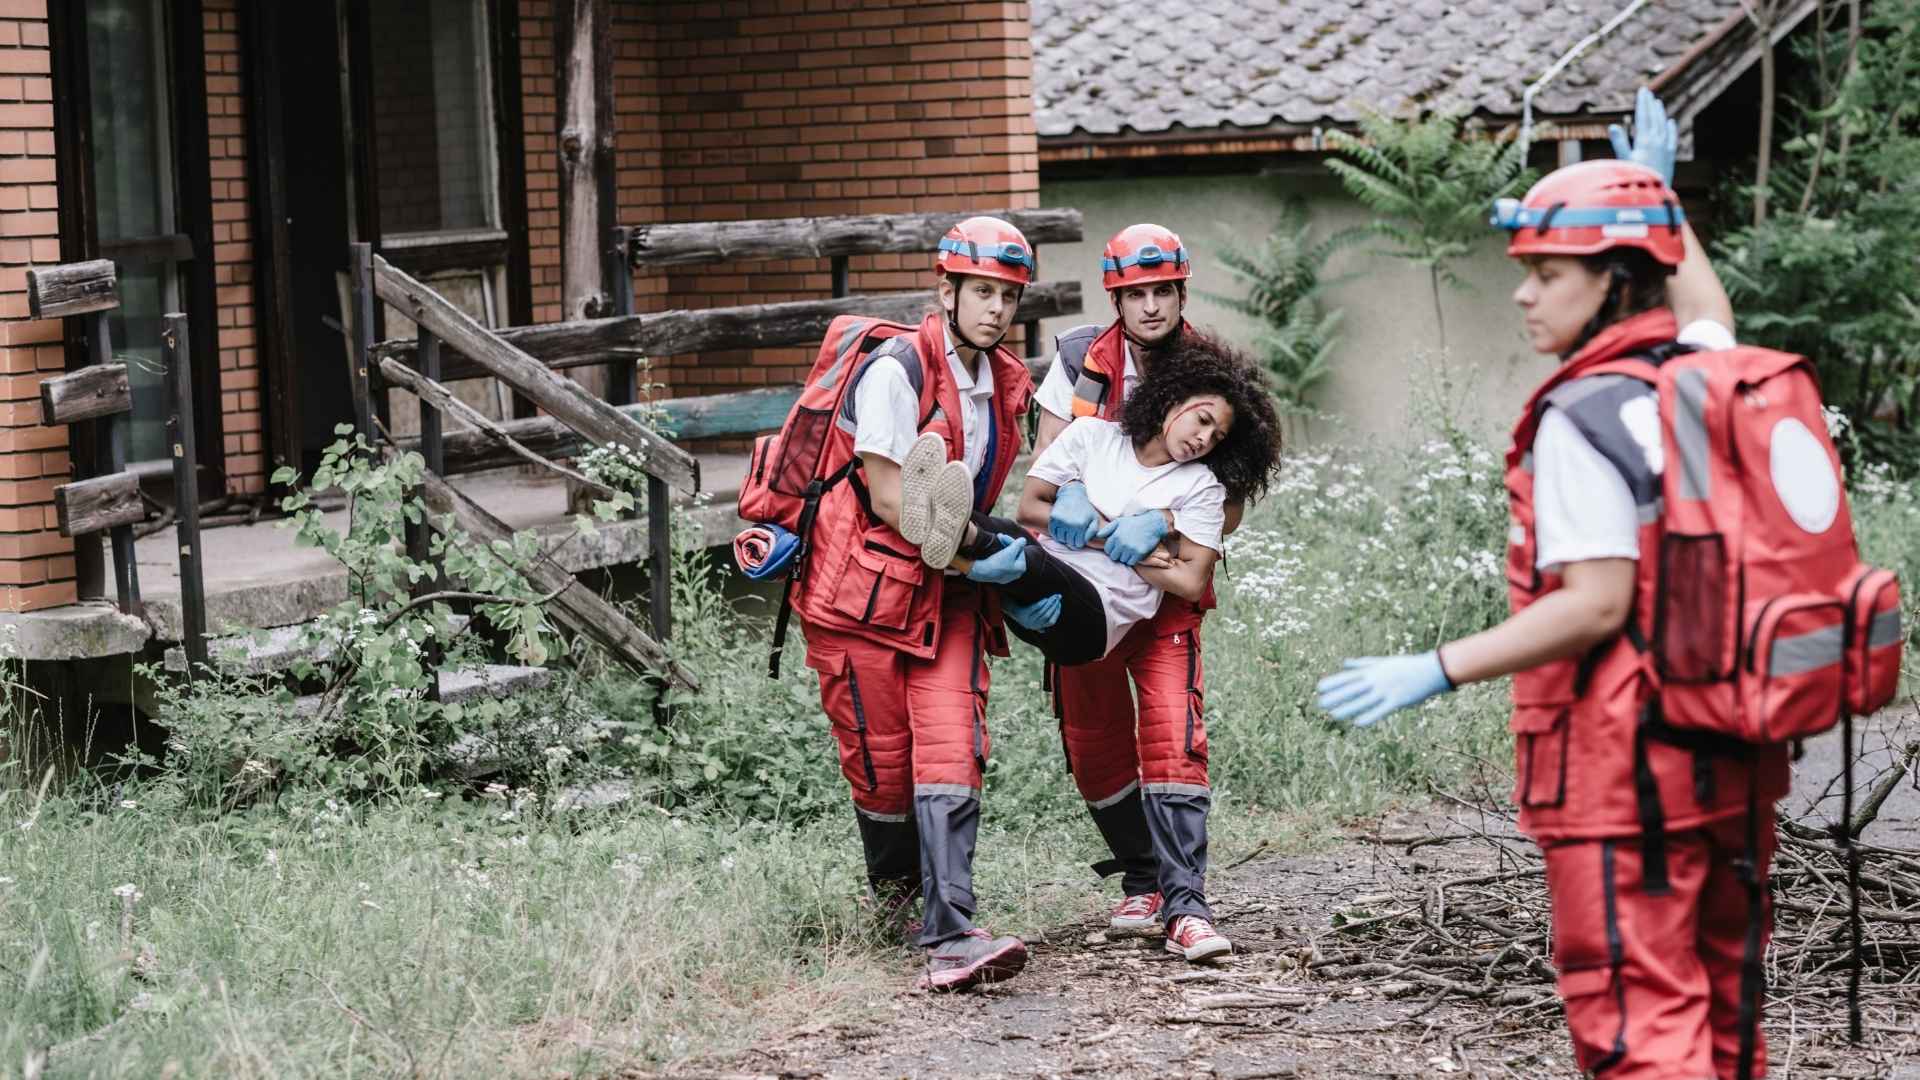
Mass shooting incidents, while rare, represent some of the most devastating emergencies that communities can face. In the chaotic moments following such an event, the actions of bystanders who know basic first aid can mean the difference between life and death for victims. Medical research consistently shows that many casualties in mass shooting events die from survivable injuries — particularly uncontrolled bleeding — because life-saving first aid was not administered in the critical minutes before paramedics could arrive on scene.
Understanding how to respond to traumatic injuries is not just valuable for healthcare workers or first responders. Everyday citizens equipped with emergency first aid knowledge can save lives during the crucial gap between the moment of injury and the arrival of emergency medical services. This guide covers the essential first aid techniques that can help victims of mass casualty events survive until professional help takes over.
The Critical Importance of Bystander Response
In any mass casualty event, emergency medical services face extraordinary challenges. The sheer number of victims, the need to secure the scene, and the logistical complexity of deploying multiple ambulances all contribute to delayed medical care. Studies of mass casualty incidents reveal that the average time for EMS to reach victims can be significantly longer than in a standard emergency call. During this delay, bystanders who have received CPR and first aid training become the frontline of medical response.
The concept of the “Platinum Ten Minutes” — the first ten minutes after a traumatic injury — highlights how critical immediate intervention is. Hemorrhage, or severe bleeding, is the number one cause of preventable death in trauma situations. A person can bleed to death from a major wound in as little as three to five minutes. This timeline makes it clear that waiting for paramedics is simply not an option when someone is bleeding profusely.
Prioritizing Your Safety First
Before rushing to help anyone, you must ensure your own safety. This principle is fundamental to all emergency response and is the first thing taught in every first aid certification course. In an active threat situation, seek cover immediately and do not attempt to provide first aid until the area has been secured by law enforcement or you are confident the threat has passed. A rescuer who becomes a victim only adds to the number of people needing help.
Once you have determined it is safe to act, call 911 immediately if it has not already been done. Provide the dispatcher with as much information as possible, including the location, the number of injured people you can see, and the types of injuries present. If multiple bystanders are available, delegate the 911 call to someone specific while you begin providing first aid.
Safety Tip: Remember the acronym RUN-HIDE-FIGHT during an active threat. Only provide first aid once the scene is safe. Your safety is the top priority — you cannot help others if you become a casualty yourself.
Controlling Severe Bleeding: The Most Critical Skill
The single most important first aid skill in a mass casualty scenario is the ability to control severe bleeding. There are several techniques you can use depending on the location and severity of the wound:
Direct Pressure
For most wounds, applying firm, direct pressure is the first and most effective method of controlling bleeding. Use a clean cloth, clothing, or gauze and press it firmly against the wound. Do not lift the material to check if the bleeding has stopped — this disrupts any clots that may be forming. If blood soaks through the first layer of material, add more on top without removing the original dressing. Maintain steady, firm pressure until emergency medical services arrive.
Wound Packing
For deep wounds, particularly those in areas where a tourniquet cannot be applied such as the neck, armpit, or groin, wound packing is essential. This involves stuffing clean material directly into the wound cavity and then applying firm pressure on top. While this may seem counterintuitive and uncomfortable for the victim, it is a proven life-saving technique that stops internal bleeding by creating pressure from within the wound itself.
Tourniquet Application
For severe bleeding from an arm or leg that cannot be controlled with direct pressure alone, a tourniquet may be necessary. A commercial tourniquet is ideal, but in an emergency, you can improvise one using a belt, tie, or strip of fabric at least 4 centimetres wide. Apply the tourniquet 5 to 7 centimetres above the wound — never directly on a joint — and tighten it until the bleeding stops. Note the time of application, as this information is critical for medical professionals. Contrary to outdated beliefs, modern medical guidance confirms that properly applied tourniquets save lives and rarely result in limb loss.
Treating Chest Wounds
Gunshot wounds to the chest are particularly dangerous because they can cause a condition called pneumothorax, commonly known as a collapsed lung. If you see a wound on the chest that is bubbling or making a sucking sound, this is a “sucking chest wound” and requires immediate attention. Cover the wound with an occlusive dressing — any non-porous material such as plastic wrap, a plastic bag, or even a credit card can work in an emergency. Seal the dressing on three sides, leaving the fourth side open to allow air to escape but preventing air from being sucked into the chest cavity. This improvised chest seal can prevent a life-threatening tension pneumothorax.
Managing Shock
Victims of traumatic injuries frequently go into shock, a dangerous condition where the body’s organs are not receiving enough blood flow. Signs of shock include pale or clammy skin, rapid shallow breathing, confusion, weakness, and a rapid pulse. To manage shock, keep the victim lying down with their legs elevated about 30 centimetres if possible and if their injuries allow. Cover them with a blanket or jacket to maintain body temperature. Reassure them calmly and continuously, as psychological support is an important component of shock management. Do not give them anything to eat or drink.
Watch: How to Perform CPR
Triage: Prioritizing Multiple Victims
When multiple people are injured, you must quickly assess who needs help most urgently. This process is called triage. As a general rule, prioritize victims with severe bleeding that can be controlled, as these individuals have the best chance of survival with immediate intervention. Victims who are alert and able to walk should be directed to move to a safe area on their own. Unfortunately, in mass casualty events, some victims may have injuries that are beyond what bystander first aid can address — focus your efforts where they can have the greatest impact.
The Role of First Aid Training in Emergency Preparedness
While this article provides an overview of critical techniques, reading about first aid is no substitute for hands-on training. In a high-stress emergency, trained individuals perform significantly better than those without training because muscle memory and practiced skills take over when the mind is overwhelmed by the situation. Comprehensive first aid courses cover these techniques in detail, providing realistic practice scenarios that build both competence and confidence.
Advanced courses such as Emergency Medical Responder (EMR) training provide even more in-depth trauma management skills, including advanced bleeding control, spinal immobilization, and patient assessment techniques. For those in high-risk environments or those who simply want to be as prepared as possible, EMR certification represents the gold standard of pre-hospital emergency care training.
Building a Personal Emergency Kit
Having the right supplies readily available can dramatically improve your ability to help in an emergency. Consider carrying a compact trauma kit that includes items such as a commercial tourniquet, hemostatic gauze, chest seals, compression bandages, and nitrile gloves. These kits are small enough to fit in a backpack, glove compartment, or desk drawer, and they can make the difference between effective first aid and feeling helpless in a crisis. Many first aid training providers sell or recommend specific trauma kits as part of their courses.
Executive Summary: Survival in mass casualty events depends on immediate bystander emergency first aid specifically focused on hemorrhage control. Per 2026 protocols, the use of tourniquets and wound packing is the primary defense against preventable death from blood loss. All field care is intended to stabilize the victim for the emergency room, making accurate hand-off reports and “Stop the Bleed” training essential for every citizen. Coast2Coast provides Intermediate and Advanced First Aid courses that prepare you to act with precision during these critical moments.
Be Prepared to Save a Life
Enroll in a Canadian Red Cross First Aid course with Coast2Coast First Aid and Aquatics. Learn life-saving skills including bleeding control, CPR, and trauma management that could make you the difference in an emergency.
Register Now
A
About the Author
Ashkon Pourheidary, B.Sc. (Hons) — Co-Founder, Coast2Coast First Aid & Aquatics
Ashkon has been a certified First Aid and CPR instructor since 2011 and an Instructor Trainer since 2013. He is also a certified Emergency Medical Responder (EMR) instructor, Psychological First Aid instructor, and BLS (Basic Life Support) instructor. Ashkon graduated with honours with a Bachelor of Science in Neuroscience from the University of Toronto in 2016. As co-founder of Coast2Coast First Aid & Aquatics, he has helped grow the organization to over 30 locations across Canada and into the United States. Connect on LinkedIn
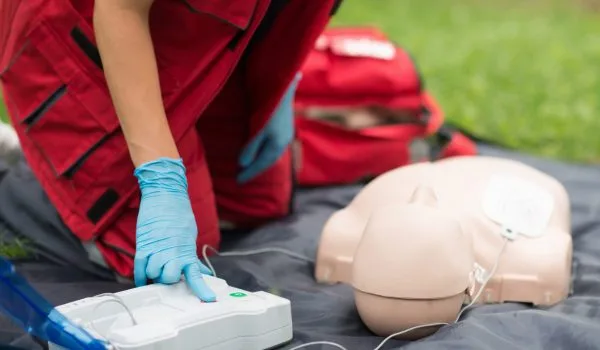
What Is an AED? Understanding Automated External Defibrillators
An Automated External Defibrillator (AED) is a portable, life-saving medical device designed to treat sudden cardiac arrest (SCA) by delivering an electrical shock to the heart. When someone experiences SCA, their heart stops beating effectively and begins to quiver in an abnormal rhythm called ventricular fibrillation. An AED analyzes the heart’s rhythm and, if necessary, delivers a controlled electrical shock to restore a normal heartbeat. Understanding how AEDs work alongside CPR can mean the difference between life and death in a cardiac emergency.
Unlike what many people assume, you do not need to be a medical professional to use an AED. These devices are specifically designed for use by ordinary bystanders with minimal or no training. The machine provides clear voice prompts and visual instructions that guide the user through every step of the process. This accessibility is precisely why AEDs have become increasingly common in public spaces across Canada and around the world.
How Does an AED Work?
The technology behind an AED is remarkably sophisticated yet incredibly simple to operate. When you power on an AED and attach the electrode pads to the patient’s bare chest, the device immediately begins analyzing the heart’s electrical activity. The AED’s internal computer evaluates the heart rhythm and determines whether a shock is needed. If the rhythm is shockable — typically ventricular fibrillation or pulseless ventricular tachycardia — the device charges and instructs the user to press the shock button. Some fully automatic models deliver the shock without requiring the user to press anything.
It is important to understand that an AED will not deliver a shock if one is not needed. The device is programmed to recognize specific dangerous rhythms, so there is virtually no risk of accidentally shocking someone who does not require it. This built-in safety feature makes AEDs one of the most user-friendly emergency medical devices available to the general public. When combined with proper first aid and CPR training, knowing how to use an AED dramatically increases survival chances.
Why Are AEDs So Important?
Sudden cardiac arrest is one of the leading causes of death in Canada, claiming approximately 35,000 to 45,000 lives each year. When SCA occurs, every minute without defibrillation reduces the chance of survival by roughly 7 to 10 percent. Emergency medical services (EMS) typically take 8 to 12 minutes to arrive, meaning that without immediate intervention, a cardiac arrest victim’s survival odds drop dramatically before professional help reaches them.
This is where AEDs become critically important. When a bystander uses an AED within the first few minutes of cardiac arrest, survival rates can increase to 70 percent or higher. Compare that to the less than 10 percent survival rate when defibrillation is delayed until paramedics arrive, and the case for widespread AED availability becomes undeniable. Having AEDs accessible in public locations and training people to use them creates a chain of survival that bridges the gap between cardiac arrest and professional medical care.
Defibrillation and the Emergency Room Transition
The use of an AED in the field provides a critical “head start” for the medical team at the emergency room. When an AED is applied, it records the heart’s rhythm data, which can later be downloaded by physicians in the emergency room to determine the exact cause of the cardiac event. This data allows cardiologists to decide immediately if a patient needs an emergency stent, a pacemaker, or specific medication. Furthermore, if a shock was delivered successfully before paramedics arrived, the patient’s chances of reaching the emergency room with intact neurological function increase by over 60%. Understanding that the AED is the first link in a chain that ends in the emergency room highlights why every second counts during a rescue.
Safety Tip: When using an AED, always make sure no one is touching the patient before delivering a shock. Loudly announce “Clear!” and visually confirm that everyone has stepped back before pressing the shock button.
Essential Benefits of AED Integration in Public Spaces
The integration of an Automated External Defibrillator (AED) into public infrastructure is the single most effective strategy for increasing cardiac arrest survival rates outside of a hospital. While performing high-quality CPR is vital, only an Automated External Defibrillator (AED) can stop the chaotic electrical activity of ventricular fibrillation and allow the heart’s natural pacemaker to restart. In 2026, smart-city initiatives in Canada have begun linking public Automated External Defibrillator (AED) units to emergency dispatch apps, allowing bystanders to be alerted to the nearest device in real-time. By placing these user-friendly devices in high-traffic zones, communities create a resilient safety net that empowers non-medical bystanders to act as life-saving first responders.
Where Can You Find AEDs in Canada?
AEDs are becoming increasingly common in public spaces throughout Canada. Federal and provincial regulations, along with growing public awareness, have driven the installation of these devices in many high-traffic locations. Here are the most common places where you can find AEDs:
Airports and Transportation Hubs
Major Canadian airports including Toronto Pearson, Vancouver International, and Montreal-Trudeau have AEDs placed throughout their terminals. Train stations, bus terminals, and ferry terminals also commonly have AED units available. These high-traffic areas see millions of people annually, making AED placement essential for responding to cardiac emergencies quickly.
Shopping Malls and Retail Centres
Large shopping centres across Canada are increasingly required to have AEDs on site. You will typically find them near customer service desks, food courts, or security offices. Next time you visit your local mall, take a moment to note where the AED cabinets are located — that awareness could save a life someday.
Schools, Colleges, and Universities
Educational institutions from elementary schools to universities often have AEDs installed in gymnasiums, main offices, and common areas. Given the number of young athletes participating in physical activities at these facilities, having AEDs readily available is particularly important for protecting students, staff, and visitors.
Fitness Centres and Sports Facilities
Gyms, recreational centres, arenas, and sports complexes are high-risk environments for cardiac events due to the physical exertion involved. Most fitness facilities in Canada now have AEDs available, typically near the front desk or in the main workout area. Community pools and aquatic centres are also equipped with these devices, often as part of their BLS and lifeguard safety protocols.
Workplaces and Office Buildings
Many Canadian employers now include AEDs as part of their workplace safety equipment. Office towers, factories, warehouses, and government buildings frequently have AED units installed on each floor or in centralized locations. Corporate first aid and CPR training programs often include AED training to ensure employees can respond effectively in emergencies.
Community Centres and Places of Worship
Libraries, community halls, churches, mosques, temples, and other gathering places increasingly have AEDs available. These locations serve diverse populations including elderly individuals who may be at higher risk for cardiac events, making AED access especially valuable.
How to Recognize an AED
AEDs are typically stored in bright, clearly marked wall-mounted cabinets. Look for a green or white sign featuring a heart with a lightning bolt symbol — this is the universal AED sign. Many AED cabinets are equipped with audible alarms that sound when the cabinet is opened, alerting nearby people that a cardiac emergency may be in progress. The devices themselves are usually compact, often resembling a small laptop case or lunch box, and are designed to be grabbed quickly and carried to the patient.
Watch: How to Use an AED
Step-by-Step Guide to Using an AED
While AEDs are designed to be intuitive, understanding the basic steps beforehand can help you respond more confidently in an emergency. Here is what you should do:
Step 1: Call 911 immediately. Before anything else, ensure that emergency medical services have been contacted. If other bystanders are present, direct someone specific to make the call while you retrieve the AED.
Step 2: Begin CPR. If the person is unresponsive and not breathing normally, start chest compressions immediately. Push hard and fast in the centre of the chest at a rate of 100 to 120 compressions per minute. Continue CPR until the AED is ready to use.
Step 3: Turn on the AED. Power on the device and listen carefully to the voice prompts. The AED will guide you through each step clearly and calmly.
Step 4: Attach the electrode pads. Expose the patient’s chest and place the adhesive pads exactly as shown in the diagrams on the pads. One pad goes on the upper right chest below the collarbone, and the other goes on the lower left side of the chest.
Step 5: Allow the AED to analyze. Make sure nobody is touching the patient while the device analyzes the heart rhythm. The AED will tell you whether a shock is advised.
Step 6: Deliver the shock if advised. If the AED recommends a shock, ensure everyone is clear of the patient and press the shock button when prompted. After the shock, immediately resume CPR as directed by the AED.
AED Training and Certification in Canada
While anyone can use an AED in an emergency, proper training significantly increases your confidence and effectiveness. The CPR and AED certification courses offered through the Canadian Red Cross provide comprehensive hands-on training that covers AED operation, CPR techniques, and how to manage a cardiac emergency from start to finish. These courses are available at training locations across Canada and can be completed in just a few hours.
For those who prefer flexible scheduling, blended online and in-person training options are also available, allowing you to complete the theory portion at your own pace before attending a shorter hands-on skills session. Employers looking to train their entire team can also arrange private group training sessions at their workplace for maximum convenience.
AED Laws and Good Samaritan Protection in Canada
Many Canadians hesitate to use an AED because they worry about legal liability. The good news is that every Canadian province has Good Samaritan legislation that protects bystanders who provide emergency assistance in good faith. If you use an AED to help someone experiencing cardiac arrest, you are legally protected from liability as long as you are acting reasonably and without gross negligence. These laws exist specifically to encourage bystander intervention, because the alternative — doing nothing — almost certainly results in death.
Several provinces have also enacted legislation requiring AEDs in certain public buildings and mandating that staff receive training in their use. Ontario’s Chase McEachern Act (Heart Defibrillator Civil Liability Act), for example, provides specific legal protection for AED users and encourages broader AED placement in public spaces.
Maintaining an AED
If your workplace, school, or community organization owns an AED, regular maintenance is essential to ensure the device is always ready when needed. AED batteries typically last 2 to 5 years, and electrode pads have expiration dates that must be monitored. Most modern AEDs perform automatic self-checks and display a status indicator — usually a green checkmark or flashing light — to confirm the device is operational. Designate someone in your organization to perform monthly visual inspections and keep a maintenance log to track battery and pad replacement schedules.
Executive Summary: An Automated External Defibrillator (AED) is a critical tool that analyzes heart rhythms and delivers a life-saving shock during sudden cardiac arrest. Per 2026 CSA Z1210:24 standards, public access to AEDs in malls, gyms, and workplaces is essential for survival, as every minute without defibrillation reduces survival odds by 10%. By providing early intervention before a patient reaches the emergency room, bystanders can triple the chances of a positive outcome. Coast2Coast offers Intermediate First Aid and BLS courses to ensure you are ready to use an AED with confidence.
Learn How to Use an AED and Save a Life
Enroll in a Canadian Red Cross CPR and AED course with Coast2Coast First Aid and Aquatics. Get hands-on training that prepares you to respond confidently in a cardiac emergency.
Ashkon Pourheidary, B.Sc. (Hons) — Co-Founder, Coast2Coast First Aid & Aquatics
Ashkon has been a certified First Aid and CPR instructor since 2011 and an Instructor Trainer since 2013. He is also a certified Emergency Medical Responder (EMR) instructor, Psychological First Aid instructor, and BLS (Basic Life Support) instructor. Ashkon graduated with honours with a Bachelor of Science in Neuroscience from the University of Toronto in 2016. As co-founder of Coast2Coast First Aid & Aquatics, he has helped grow the organization to over 30 locations across Canada and into the United States. Connect on LinkedIn
Last Updated: March 4, 2026 Medical Review: Aryan Sekhavati, Director at Coast2Coast
Bystander CPR can double or triple cardiac arrest survival rates by maintaining brain oxygenation until paramedics arrive. Performing chest compressions within the first 2–4 minutes is critical to preventing permanent neurological damage. This 2026 guide covers WSIB-approved techniques, AED use, and legal protections under Ontario’s Good Samaritan Act.
The Reality of Cardiac Arrest in Canada
Every 12 minutes, someone in Canada suffers a cardiac arrest outside of a hospital setting. In the Greater Toronto Area (GTA) alone, paramedics respond to thousands of cardiac emergencies annually. The survival rate for these events depends almost entirely on what happens in the first few minutes—the “Platinum Minutes”—before professional medical help arrives. Bystander CPR is the single most important factor in determining whether a cardiac arrest victim survives.
Knowing CPR and AED use transforms you from a helpless observer into a lifesaver. The skills are straightforward, the training takes less than a day, and the potential impact is immeasurable. A person trained in CPR carries the ability to save a life wherever they go—at home, at work, in a shopping mall, or on public transit. Coast2Coast First Aid and Aquatics, a Canadian Red Cross Training Partner, has certified thousands of Canadians at training locations across the GTA, ensuring that our communities are prepared for the unexpected.
Understanding Cardiac Arrest: An Electrical Malfunction
Cardiac arrest is often confused with a heart attack, but the two are clinically distinct. A heart attack is a “plumbing” problem caused by a blockage in the blood vessels supplying the heart. In contrast, cardiac arrest is an “electrical” problem where the heart suddenly stops beating effectively. The heart begins to quiver chaotically (ventricular fibrillation) instead of pumping blood.
Without blood flow, the brain begins to suffer permanent damage within four to six minutes. Death follows within eight to ten minutes without intervention. This unpredictable malfunction can strike anyone, at any age. While heart disease and high blood pressure are risk factors, cardiac arrest also affects seemingly healthy athletes and young adults due to undiagnosed heart defects or “commotio cordis”—a cardiac arrest caused by a blow to the chest. This is why widespread Basic Life Support (BLS) training for professionals and Level C training for the public is so critical.
Safety Tip: If you are alone and witness a cardiac arrest, call 911 first and put your phone on speaker. Then begin chest compressions immediately. Push hard and fast in the center of the chest at a rate of 100 to 120 compressions per minute. Do not stop compressions until help arrives or you are too exhausted to continue.
The Physiology of CPR: How Chest Compressions Work
Many people ask, “How can pushing on someone’s chest actually save them?” The answer lies in the Manual Pump Theory. When you perform high-quality chest compressions, you are physically squeezing the heart between the breastbone (sternum) and the spine. This action creates enough internal pressure to force oxygenated blood out of the heart and up to the brain.
During CPR, you aren’t just “beating” the heart; you are maintaining a artificial circulatory system. Even though CPR only provides about 25–30% of normal blood flow, that is often enough to keep the brain cells alive until an Automated External Defibrillator (AED) can be used to restart the heart’s natural rhythm.
Watch: How To Perform CPR – Coast2Coast Official
The Critical Minutes: Why Bystander Intervention is Non-Negotiable
When someone collapses, a countdown begins. For every minute that passes without CPR, the chance of survival decreases by 7% to 10%. By the time ten minutes have passed without intervention, survival is statistically unlikely. In a sprawling metropolis like the GTA, traffic conditions and high call volumes can push ambulance response times to 8 minutes or longer.
Bystander CPR serves as the “Bridge to Life.” When a bystander begins compressions within the first two minutes, survival rates can exceed 40%. These statistics prove that the most important link in the Chain of Survival is not the doctor in the ER, but the person standing next to the victim when they fall.
Safety Tip: If you witness a collapse, call 911 and put your phone on speaker. Begin chest compressions immediately. Push hard (at least 2 inches deep) and fast (100–120 beats per minute) in the center of the chest. Do not stop until help arrives or an AED is ready to analyze the victim.
CPR Combined with AED Use: The Ultimate Life-Saving Duo
While CPR maintains blood flow, it rarely “restarts” the heart. That is the job of the AED. These portable devices analyze the heart’s rhythm and deliver a targeted electrical shock to “reset” the electrical system. When CPR and AED use are combined within the first few minutes, survival rates can climb as high as 75%.
AEDs are now standard in public spaces across Ontario—from Union Station to local community centers. They are designed for use by anyone, providing step-by-step voice instructions. However, taking a CPR and AED course removes the “fear factor.” In a high-stress emergency, you won’t have to read the manual for the first time; you will act on instinct.
Overcoming the Fear of Action: The Good Samaritan Act
The biggest barrier to bystander intervention is fear—fear of doing it wrong, fear of breaking ribs, or fear of being sued. In Ontario, the Good Samaritan Act (2001) protects you from these concerns.
Legally, you cannot be held liable for damages while providing emergency assistance in good faith, provided you act within the scope of your training and without gross negligence. Furthermore, it is important to remember that a person in cardiac arrest is clinically dead; you cannot make their situation “worse” by attempting to save them. Yes, ribs may crack during effective CPR, but as the saying goes: “Broken ribs heal; death does not.”
Professional vs. Public: Which CPR Course Do You Need?
Not all CPR training is the same. It is vital to choose the level that matches your needs or workplace requirements:
CPR Level C: The standard for the general public, parents, and most workplaces. It covers adult, child, and infant CPR.
Basic Life Support (BLS): Formerly known as Healthcare Provider (HCP) CPR. This is required for nurses, doctors, paramedics, and firefighters. It focuses on team-based high-performance rescue.
Emergency First Aid: A shorter course for those who need a basic overview of life-saving skills.
All our courses are certified by the Canadian Red Cross and meet 2026 WSIB compliance standards.
Building a Safer Community through Certification
When you get certified, you aren’t just gaining a certificate; you are gaining the power to change the outcome of a tragedy. Coast2Coast offers Blended Online Learning so you can complete the theory at home, followed by a brief in-person practical session at one of our GTA branches.
Frequently Asked Questions: 2026 CPR Guidelines
1. Do I need to give mouth-to-mouth during CPR?
For untrained bystanders, “Hands-Only CPR” (compressions only) is highly effective and recommended by the Red Cross for adult victims. However, in our courses, we teach you how to use pocket masks and provide rescue breaths, which are critical for drowning and pediatric victims.
2. Can I use an AED on a child or infant?
Yes. Most modern AEDs have pediatric pads or a “child mode.” If those are not available, you can use adult pads, ensuring they do not touch each other (typically one on the chest and one on the back for infants).
3. What is the “4-Minute Rule” in CPR?
The brain can only survive for approximately four minutes without oxygen before permanent damage begins. This is why immediate bystander CPR is necessary; you must keep the brain oxygenated until professional help arrives.
4. How often do I need to recertify?
In Canada, CPR certifications are valid for three years. However, many healthcare and workplace settings require annual recertification to ensure skills remain sharp and up-to-date with the latest medical guidelines.
5. How hard should I actually push during compressions?
For an adult, you must compress the chest at least 2 inches (5 cm). It requires significant force, which is why we practice on mannequins to help you gauge the necessary pressure.
6. Can I use an AED if the person has a pacemaker?
Yes. You can still use an AED. Simply avoid placing the AED pad directly over the visible lump of the pacemaker (place it at least an inch away). The AED will still function correctly.
7. Does the Good Samaritan Act protect me if I make a mistake?
Yes. As long as you act in good faith and trying to help the victim to the best of your ability, the law protects you from liability in Ontario.
Be the Difference: Get Certified Today
Cardiac arrest doesn’t wait for a convenient time. Be ready to save a life by getting certified in First Aid and CPR with Coast2Coast.