To control life-threatening external bleeding, apply firm continuous direct pressure over the wound using a clean cloth or gauze pad, and call 911 immediately. If the wound is deep and in an area like the groin or armpit, pack it firmly with gauze; if the bleed is on a limb and direct pressure fails, apply a tourniquet two to three inches above the wound. Arterial bleeding can be fatal within two to five minutes, making fast, decisive action the single most important factor in survival.
Controlling Life-Threatening External Bleeding: A Complete First Aid Guide
Uncontrolled external bleeding is one of the leading causes of preventable death in trauma situations. When a person suffers a severe injury that damages a major blood vessel, they can lose a life-threatening amount of blood in just minutes. The ability to quickly recognize and control severe bleeding is arguably the most important skill a first aider can possess, because your immediate actions in those critical first moments can mean the difference between life and death. Bleeding control is a core component of all first aid training programs. This guide provides a thorough overview of how to assess bleeding severity, the techniques for controlling life-threatening hemorrhage, and the steps you should take to keep the injured person alive until professional medical help arrives.
Understanding the Severity of Bleeding
Not all bleeding is the same, and being able to assess the severity of a bleed quickly and accurately will help you determine the appropriate first aid response. Bleeding is generally classified into three categories based on the type of blood vessel that has been damaged and the characteristics of the blood flow.
Capillary Bleeding
Capillary bleeding is the most common and least serious type of external bleeding. It occurs when the tiny capillaries near the skin’s surface are damaged, such as from a minor scrape or abrasion. The blood oozes slowly from the wound and is typically dark red in colour. Capillary bleeding usually stops on its own within a few minutes as the body’s natural clotting mechanisms take effect. Simple first aid measures such as cleaning the wound and applying a bandage are sufficient for managing this type of bleeding.
Venous Bleeding
Venous bleeding occurs when a vein has been damaged. Veins carry deoxygenated blood back to the heart, so venous blood is typically dark red in colour and flows steadily from the wound. While venous bleeding can be significant, it is generally easier to control than arterial bleeding because the blood is under lower pressure. However, damage to a large vein can still result in substantial blood loss if not controlled promptly.
Arterial Bleeding
Arterial bleeding is the most dangerous type of external bleeding and constitutes a true life-threatening emergency. Arteries carry oxygen-rich blood away from the heart under high pressure, so arterial bleeding is characterized by bright red blood that spurts or pulses from the wound in rhythm with the heartbeat. A severed or damaged artery can cause a person to bleed to death in as little as two to five minutes, making immediate intervention absolutely critical.
The Stop the Bleed Approach
The principles of bleeding control have been widely promoted through initiatives that emphasize the role of bystanders in saving lives during bleeding emergencies. The fundamental approach follows a straightforward sequence: ensure your own safety, call for help, and apply direct pressure to stop the bleeding.
Step 1: Ensure Scene Safety
Before approaching a bleeding person, take a moment to assess the scene for hazards. Ensure that the cause of the injury no longer poses a threat to you or the injured person. If possible, put on disposable gloves or use a barrier to protect yourself from contact with blood, as bloodborne pathogens can transmit serious infections. If gloves are not available, use plastic bags, clean cloths, or any waterproof material as a barrier between your hands and the person’s blood.
Step 2: Call Emergency Services
Call 911 or have someone else call immediately. Severe bleeding requires professional medical treatment, including potential surgical intervention and blood transfusion. While waiting for help to arrive, your role as a first aider is to slow or stop the bleeding and prevent the person from going into shock. If you are alone, put your phone on speaker so you can communicate with the dispatcher while providing first aid.
Step 3: Apply Direct Pressure
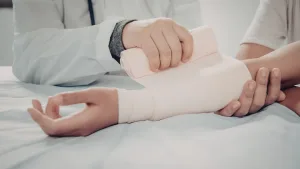
Direct pressure is the primary technique for controlling external bleeding and is effective for the vast majority of bleeding wounds. Place a clean cloth, gauze pad, or other absorbent material directly over the wound and press firmly with your hands. Use both hands if necessary to apply adequate pressure, and lean your body weight into the wound to compress the damaged blood vessels. Maintain continuous, firm pressure without lifting the dressing to check the wound, as this can disrupt clot formation and restart the bleeding.
In some situations, applying pressure to the pressure points nearest the wound, such as the brachial artery for arm bleeds or the femoral artery in the groin for leg bleeds, can supplement direct wound pressure by partially reducing blood flow through the artery supplying the injured area. However, direct pressure on the wound itself remains the most effective and reliable first response for controlling external hemorrhage.
Step 4: Pack the Wound if Needed
For deep wounds, particularly those in areas such as the groin, armpit, or neck where a tourniquet cannot be applied, wound packing may be necessary. This involves firmly packing clean gauze or cloth material into the wound cavity to create internal pressure against the damaged blood vessels. Push the material deep into the wound, filling the entire cavity, and then apply firm direct pressure on top.
Tourniquet Application
A tourniquet is a device used to compress the blood vessels in a limb to stop life-threatening bleeding that cannot be controlled by direct pressure alone. Once reserved primarily for military use, tourniquets are now widely recommended for civilian first aid in situations involving severe limb bleeding.
When to Use a Tourniquet
A tourniquet should be used when direct pressure has failed to control severe bleeding from a limb, when the bleeding is so severe that direct pressure is clearly insufficient (such as with a partial or complete amputation), when you are unable to reach the wound to apply direct pressure, or when you need to manage multiple casualties. A tourniquet is only effective on limb injuries and cannot be used for bleeding from the head, neck, or torso.
How to Apply a Tourniquet
If a commercial tourniquet is available, follow the manufacturer’s instructions for application. Generally, place the tourniquet two to three inches above the wound, between the wound and the heart. Never place a tourniquet directly over a joint. Tighten the tourniquet until the bleeding stops completely, and secure it in place. Note the time of application, as this information is critical for the medical team. Once applied, a tourniquet should not be removed except by medical professionals.
Commercial windlass tourniquets, such as the CAT (Combat Application Tourniquet), use a rigid windlass rod that is twisted to progressively increase band pressure around the limb until blood flow is fully occluded. The windlass is then locked to maintain that pressure. If no commercial tourniquet is available, an improvised tourniquet can be made from a cloth strip at least two inches wide, with a pen or stick serving as the windlass. While an improvised version is less reliable than a commercial device, it can be life-saving when no other option exists.
Practice Tourniquet and Bleeding Control Hands-On
Reading about tourniquet application is a start. Practising on a manikin with an instructor who can correct your technique is what builds real confidence.
Managing Shock from Blood Loss
Severe blood loss frequently leads to hypovolemic shock, a life-threatening condition where the body does not have enough blood to maintain adequate circulation. Signs of shock include pale, cool, and clammy skin, rapid and weak pulse, rapid and shallow breathing, confusion or altered consciousness, weakness and dizziness, and nausea or vomiting. To manage shock, lay the person down and elevate their legs approximately twelve inches if there are no suspected leg or spinal injuries. Keep them warm with blankets or coats to prevent heat loss. Do not give them anything to eat or drink, as they may require surgery.
Special Bleeding Situations
Nosebleeds
Have the person sit upright and lean slightly forward to prevent blood from flowing down the throat. Pinch the soft part of the nose firmly for at least ten minutes without releasing. If the nosebleed does not stop after twenty minutes of continuous pressure, or if it was caused by a head injury, seek medical attention.
Embedded Objects
If a foreign object is embedded in a wound, do not attempt to remove it. Apply pressure around the object using bulky dressings to stabilize it, and bandage the dressings in place without pressing on the object. Leave removal to the medical professionals at the hospital.
Internal Bleeding
Internal bleeding cannot be controlled with first aid techniques, but it is important to recognize the signs: bruising, swelling, tenderness, coughing or vomiting blood, blood in the urine or stool, abdominal rigidity, and signs of shock without visible external bleeding. If you suspect internal bleeding, call 911 immediately.
Why Every Person Should Learn Bleeding Control
Severe bleeding emergencies can happen anywhere and at any time, from workplace accidents and car crashes to incidents in the home and community. Research shows that the actions taken by bystanders in the first few minutes of a bleeding emergency have a profound impact on survival outcomes. Intermediate / Intermediate/Standard First Aid and Basic/Emergency First Aid courses provide comprehensive hands-on training in bleeding control, shock management, and a wide range of other life-saving skills.
Organizations and workplaces also have a responsibility to ensure their teams are prepared. Under occupational health and safety legislation across Canadian provinces, employers are required to maintain a trained first aid presence on site. A private group training course allows your entire workforce to receive certified first aid instruction together, including hands-on bleeding control practice, at your workplace or a location of your choosing.
Train Your Entire Team in Bleeding Control
Private group courses bring certified instruction to your workplace. Every member of your team leaves knowing exactly what to do in a bleeding emergency.
Key Takeaway
Life-threatening external bleeding is a true emergency requiring immediate action. Apply firm, continuous direct pressure as your first response. For deep wounds in the groin, armpit, or neck, pack the wound with gauze. For limb bleeds that don’t respond to direct pressure, apply a tourniquet two to three inches above the wound and never remove it until medical professionals arrive. Recognize the signs of hypovolemic shock and position the person appropriately while waiting for emergency services. Knowing these skills before an emergency occurs is the difference between a bystander and a lifesaver.
Join 150,000+ Canadians Who Are Certified
Find a first aid and CPR course near you and get the hands-on training that makes the difference when it counts.
Frequently Asked Questions: Bleeding Control First Aid 2025
Q1: How do you control life-threatening external bleeding?
A: To control life-threatening external bleeding, first ensure the scene is safe and put on gloves if available. Call 911 immediately. Apply firm, continuous direct pressure over the wound using a clean cloth or gauze pad. For deep wounds in areas like the groin or armpit, pack the wound firmly with gauze. If the bleeding is on a limb and direct pressure fails, apply a tourniquet two to three inches above the wound. Do not remove the tourniquet once applied; note the time of application and wait for emergency services.
Q2: What are the three types of external bleeding?
A: The three types of external bleeding are capillary, venous, and arterial. Capillary bleeding is the least serious and involves slow oozing of dark red blood from minor scrapes; it usually stops on its own. Venous bleeding occurs when a vein is damaged and produces a steady flow of dark red blood; it can be significant but is generally controllable with direct pressure. Arterial bleeding is the most dangerous type: bright red blood spurts or pulses in rhythm with the heartbeat and can be fatal within two to five minutes without intervention.
Q3: When should you use a tourniquet for bleeding?
A: Use a tourniquet when severe bleeding from a limb cannot be controlled by direct pressure, when bleeding is so severe that direct pressure is clearly insufficient such as with an amputation, when you cannot reach the wound to apply pressure, or when managing multiple injured people. Tourniquets are only effective on limb injuries; they cannot be used on the head, neck, or torso. Place the tourniquet two to three inches above the wound, never over a joint, and tighten until bleeding stops completely. Note the time of application.
Q4: What is hypovolemic shock and what are the signs?
A: Hypovolemic shock is a life-threatening condition that occurs when the body loses enough blood that it can no longer maintain adequate circulation to vital organs. It is a common complication of severe external or internal bleeding. Signs include pale, cool, and clammy skin; a rapid and weak pulse; rapid and shallow breathing; confusion or altered consciousness; weakness and dizziness; and nausea or vomiting. To manage shock, lay the person down, elevate their legs approximately twelve inches if there are no suspected leg or spinal injuries, and keep them warm until emergency services arrive.
Q5: What is wound packing and when is it used?
A: Wound packing is a technique used to control bleeding from deep wounds, particularly in areas where a tourniquet cannot be applied, such as the groin, armpit, or neck. It involves firmly packing clean gauze or cloth material into the wound cavity to create internal pressure against the damaged blood vessels. Push the material deep into the wound, filling the entire cavity, then apply firm direct pressure on top of the packing. Wound packing is most effective when the wound is deep and has an opening that can be filled, and it should be followed immediately by calling or waiting for emergency medical services.
Q6: How long does it take for arterial bleeding to become fatal?
A: Arterial bleeding can become fatal within two to five minutes if left uncontrolled. Arteries carry oxygen-rich blood away from the heart under high pressure, meaning a severed or seriously damaged artery can cause catastrophic blood loss extremely rapidly. The characteristic sign of arterial bleeding is bright red blood that spurts or pulses from the wound in rhythm with the heartbeat. This is why immediate intervention, specifically applying direct pressure or a tourniquet on a limb, is absolutely critical. Bystanders who know how to act in the first moments of a bleeding emergency play a vital role in preventing death.
Q7: What should you do if there is an object embedded in a wound?
A: If a foreign object is embedded in a wound, do not attempt to remove it. Removing an embedded object can cause significantly greater bleeding and tissue damage. Instead, apply pressure around the object using bulky dressings to stabilize it in place, and bandage the dressings securely without pressing directly on the object itself. Keep the person as still as possible to prevent the object from shifting. Call 911 immediately and leave removal to the medical professionals at the hospital. Stabilizing the object rather than removing it is a core principle taught in Intermediate / Intermediate/Standard First Aid courses.
More FAQs: Tourniquets, Shock, and Special Bleeding Situations
Q8: How do you treat a nosebleed with first aid?
A: To treat a nosebleed, have the person sit upright and lean slightly forward to prevent blood from flowing down the throat where it could cause nausea or be swallowed. Pinch the soft part of the nose firmly and hold continuous pressure for at least ten minutes without releasing to check on the bleeding. Breathe through the mouth during this time. Do not tilt the head backward. If the nosebleed does not stop after twenty minutes of continuous pressure, if it resulted from a head injury, if it is unusually heavy, or if the person takes blood-thinning medication, seek immediate medical attention or call 911.
Q9: What are the signs of internal bleeding?
A: Internal bleeding cannot be seen from the outside but has recognizable signs: bruising, swelling, or tenderness over the affected area; coughing or vomiting blood; blood in the urine or stool; abdominal rigidity or distension; and signs of shock such as pale clammy skin, rapid weak pulse, and confusion without any visible external bleeding source. Internal bleeding is a medical emergency that cannot be controlled with first aid techniques. If you suspect internal bleeding, call 911 immediately, keep the person still and warm, and monitor their level of consciousness until emergency services arrive.
Q10: What is the correct way to apply direct pressure to a bleeding wound?
A: To apply direct pressure, place a clean cloth, gauze pad, or other absorbent material directly over the wound and press firmly with your hands. Use both hands if needed to apply adequate pressure, and lean your body weight into the wound to compress the damaged blood vessels effectively. Maintain continuous, uninterrupted pressure without lifting the dressing to check the wound, as this disrupts clot formation and can restart the bleeding. If blood soaks through the dressing, add more material on top rather than removing the original layer. Continue applying pressure until emergency services arrive or the bleeding is controlled.
Q11: How do you protect yourself from bloodborne pathogens when helping a bleeding person?
A: When helping someone who is bleeding, protect yourself from bloodborne pathogens by putting on disposable gloves before making contact with their blood whenever possible. If gloves are not available, use plastic bags, several layers of clean cloth, or any waterproof material as a barrier between your hands and the person’s blood. Avoid touching your face, eyes, or mouth during the rescue. After providing first aid, wash your hands thoroughly with soap and water as soon as possible. Bloodborne pathogens such as hepatitis B, hepatitis C, and HIV can be transmitted through contact with infected blood via cuts or mucous membranes.
Q12: What is a windlass tourniquet and how does it work?
A: A windlass tourniquet is a type of commercial tourniquet that uses a rigid rod, called a windlass, to tighten a band around a limb and compress the blood vessels beneath it to stop life-threatening bleeding. The band is wrapped around the limb, secured, and then the windlass rod is twisted to progressively increase pressure until the bleeding stops completely. The rod is then locked in place to maintain that pressure. Commercial windlass tourniquets such as the CAT (Combat Application Tourniquet) are widely recommended for civilian first aid and are included in many workplace first aid kits.
Q13: Can you use an improvised tourniquet if a commercial one is not available?
A: Yes. An improvised tourniquet can be made from a cloth strip at least two inches wide, such as a belt, torn shirt, or scarf, and a rigid object such as a pen or stick to act as a windlass. Wrap the cloth twice around the limb two to three inches above the wound, tie a half-knot, place the rigid object on top, and tie a full knot over it. Twist the object to tighten until the bleeding stops, then secure the ends. While not as effective or reliable as a commercial tourniquet, an improvised version can be life-saving when no other option is available. Note the time of application.
Q14: What first aid courses teach bleeding control?
A: Intermediate / Intermediate/Standard First Aid courses provide comprehensive hands-on training in bleeding control, including direct pressure techniques, wound packing, tourniquet application, shock management, and the management of special situations such as embedded objects and nosebleeds. Basic/Emergency First Aid courses cover the essential bleeding control techniques for acute emergencies. Both courses are offered by Canadian Red Cross Training Partners and include practical skills practice so participants can apply techniques confidently in a real emergency. Workplace-specific training is also available through private group courses for organizations that want their entire team prepared.
Q15: How do pressure points help control bleeding?
A: Pressure points are specific locations on the body where a major artery passes close to the surface over a bone, allowing external pressure to partially compress the artery and reduce blood flow to the area beyond it. Applying pressure to these points can supplement direct wound pressure in serious bleeding situations. Common pressure points include the brachial artery in the upper arm for arm bleeds and the femoral artery in the groin for leg bleeds. However, direct pressure on the wound itself remains the primary and most effective technique for controlling external hemorrhage, and pressure point techniques are typically covered in advanced first aid training.
Sources & Professional Review
This article was written and reviewed by Ashkon Pourheidary, co-founder of Coast2Coast First Aid & Aquatics, B.Sc. Hons Neuroscience, and Canadian Red Cross certified instructor since 2011.
Bleeding control guidelines referenced: Stop the Bleed (American College of Surgeons) and Canadian Red Cross First Aid guidelines. Tourniquet recommendations reflect current civilian first aid consensus.
Coast2Coast First Aid & Aquatics is a Canadian Red Cross Training Partner. Find a course location near you.